Deploy Django with Uvicorn and Nginx: A Beginner's Guide
A beginner's guide to deploying Django with Uvicorn and Nginx on an Ubuntu VPS: SSH keys, Supervisor, a firewall and free HTTPS with Certbot, step by step.

On this page
- 1. Introduction
- 2. Prerequisites
- 3. Setting Up Your VPS
- 4. Securing Your Server
- 5. Installing Required Software
- 6. Configuring Your Django Project
- 7. Nginx Configuration
- 8. Setting Up SSL with Let's Encrypt
- 9. Configuring Supervisor
- 10. Firewall Configuration
- 11. Deploying Your Django Application
- 12. Running the Redis Scheduler
- 13. Custom Scripts for Process Management
- 14. Monitoring and Maintenance
- 15. Troubleshooting
- What this setup does not cover yet
- 16. Conclusion
- Key takeaways
- Frequently asked questions
- Next step
To deploy Django with Uvicorn and Nginx, you run your project's ASGI app under Uvicorn, keep it alive with Supervisor, and put Nginx in front as a reverse proxy that also serves your static files. Certbot then adds a free Let's Encrypt certificate, and UFW closes every port you do not need. This beginner's guide walks through each command on an Ubuntu VPS, from the first SSH login to HTTPS.
In this guide:
- Set up and secure the VPS
- Configure the Django project and its permissions
- Configure Nginx as a reverse proxy
- Add HTTPS with Let's Encrypt
- Run Uvicorn, Celery and the scheduler with Supervisor
- Fix common errors
- Frequently asked questions
1. Introduction
This guide will walk you through the process of deploying a Django application with ASGI (Uvicorn) to a Virtual Private Server (VPS). We'll also cover setting up a Redis scheduler, configuring Nginx as a reverse proxy, securing your server with a firewall, and enabling HTTPS. This guide is designed for beginners, so we'll explain each step in detail.
2. Prerequisites
Before we begin, make sure you have:
A VPS running Ubuntu. This guide was first written on Ubuntu 22.04 and updated where commands differ on newer LTS releases.
A domain name (e.g.,
tymr.online) pointed to your VPS's IP addressYour Django project code (including requirements.txt)
Basic familiarity with command-line interfaces
3. Setting Up Your VPS
First, we need to access our VPS. We'll use SSH (Secure Shell) for this.
ssh root@your_server_ip
Replace your_server_ip with your VPS's IP address. You'll be prompted for a password, which you should have received from your VPS provider or in most VPS you can directly login into server after pasting the local desktop's ssh public key into the server during the setup process. for example, in digital ocean you have this feature here while creating a droplet ( VPS ) 👇
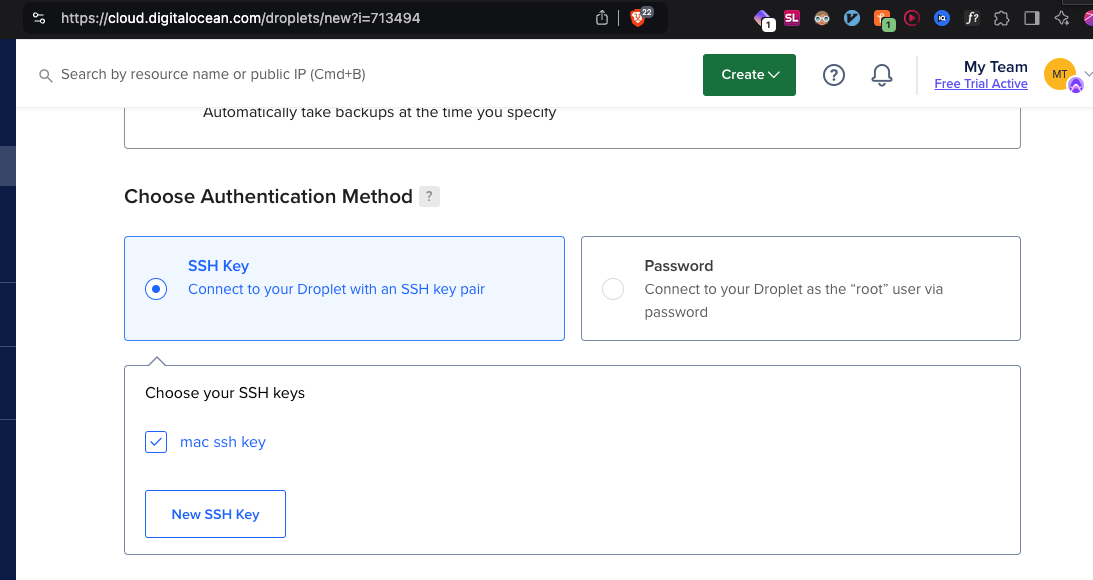
Once logged in, update your system:
sudo apt update
sudo apt upgrade -y
These commands update the list of available packages and upgrade them to their latest versions.
4. Securing Your Server
Creating a New User
It's best practice to avoid using the root user. Let's create a new user:
adduser username
Replace username with your desired username. You'll be prompted to set a password and provide some optional information.
Grant this user sudo privileges:
usermod -aG sudo username
This command adds the user to the sudo group, allowing them to run commands with superuser privileges.
Setting Up SSH Key Authentication
SSH keys are more secure than passwords. On your local machine, generate an SSH key pair:
ssh-keygen -t ed25519
This creates a public/private key pair. The public key can be freely shared, while the private key must be kept secret. Ed25519 keys are short and fast and are the usual choice today; the older ssh-keygen -t rsa -b 4096 also works.
Copy the public key to your server:
ssh-copy-id username@your_server_ip
Now, let's disable password authentication for SSH. On the server:
sudo nano /etc/ssh/sshd_config
Find and modify these lines:
PasswordAuthentication no
PermitRootLogin no
On many cloud images a file in /etc/ssh/sshd_config.d/ (often 50-cloud-init.conf) sets PasswordAuthentication yes, and the first value SSH reads wins. Check with grep -r PasswordAuthentication /etc/ssh/sshd_config.d/ and change it there too.
Save the file (Ctrl+X, then Y, then Enter) and restart the SSH service (on Ubuntu the service is called ssh):
sudo systemctl restart ssh
Now login as non root user you just created. Keep your current session open until a new login works, so a typo cannot lock you out.
5. Installing Required Software
Let's install the necessary software:
sudo apt install build-essential python3-dev python3-venv python3-pip nginx redis
This installs Python with its virtual environment module, pip (Python package manager), Nginx (web server) and Redis. The first version of this guide installed python3.11 by name; newer Ubuntu LTS releases ship a newer Python as python3, so use that and check that your Django version supports it.
6. Configuring Your Django Project
Create a directory for your project:
mkdir ~/myproject
cd ~/myproject
Upload your project files to this directory. You can use SCP, SFTP, or Git for this.
Create a virtual environment:
python3 -m venv venv
source venv/bin/activate
Install your project dependencies:
pip install -r requirements.txt
Also, install Uvicorn:
pip install uvicorn
Before going further, set DEBUG = False, your domain in ALLOWED_HOSTS, and CSRF_TRUSTED_ORIGINS = ["https://tymr.online"] in your settings, then run python manage.py check --deploy. The Django deployment checklist explains every warning it prints.
Understanding and Setting Up User Permissions for our Django project
When deploying a Django application, proper file permissions and ownership are crucial for security and functionality. Here's a detailed guide tailored for beginners:
Understanding Users and Groups
In our setup, we'll work with three main entities:
Your user account (e.g., 'normaluser')
The web server user (usually 'www-data' for Nginx on Ubuntu)
The root user
Best Practices for Django Project Files
Project Directory Ownership: Your user should own the project directory and most files.
Shell sudo chown -R normaluser:normaluser /home/normaluser/myprojectProject Directory Permissions: Set 755 (drwxr-xr-x) for directories and 644 (-rw-r--r--) for files.
Shell find /home/normaluser/myproject -type d -exec chmod 755 {} \; find /home/normaluser/myproject -type f -exec chmod 644 {} \;Sensitive Files: For files like
settings.py, use more restrictive permissions.Shell chmod 600 /home/normaluser/myproject/myproject/settings.pyStatic and Media Directories: The web server needs read access to these.
Shell sudo chown -R normaluser:www-data /home/normaluser/myproject/static sudo chown -R normaluser:www-data /home/normaluser/myproject/media sudo chmod -R 750 /home/normaluser/myproject/static sudo chmod -R 750 /home/normaluser/myproject/mediaLog Directory: Create a logs directory within your project and set appropriate permissions.
Shell mkdir -p /home/normaluser/myproject/logs sudo chown -R normaluser:www-data /home/normaluser/myproject/logs sudo chmod -R 770 /home/normaluser/myproject/logsSQLite Database (if used): If you're using SQLite, secure the database file.
Shell sudo chown normaluser:www-data /home/normaluser/myproject/db.sqlite3 sudo chmod 660 /home/normaluser/myproject/db.sqlite3Virtual Environment: Keep your virtual environment secure.
Shell chmod -R 750 /home/normaluser/myproject/venv
Explanation of Permissions
755 for directories: Owner can read/write/execute, others can read/execute.
644 for regular files: Owner can read/write, others can read.
600 for sensitive files: Only owner can read/write.
750 for static/media: Owner can read/write/execute, group (www-data) can read/execute.
770 for logs: Owner and group can read/write/execute.
660 for SQLite: Owner and group can read/write.
Security Best Practices
Principle of Least Privilege: Give only the permissions necessary for each file and directory.
Use a Non-Root User: Always run your Django application as a non-root user.
Separate Media Uploads: If possible, store user-uploaded files outside of the project directory.
Regular Audits: Periodically check and update file permissions.
Use Environment Variables: Store sensitive information like secret keys in environment variables, not in files.
Secure the Secret Key: Ensure Django's SECRET_KEY is not in version control and has restricted access.
Backup Permissions: When backing up, preserve file permissions.
Applying Changes
After setting permissions, restart your web server and Django application:
sudo systemctl restart nginx
sudo supervisorctl restart all
Verifying Permissions
You can verify permissions using the ls -l command. For example:
ls -l /home/normaluser/myproject
This will show you the permissions for files and directories in your project root.
Remember, these settings are a starting point. You may need to adjust based on your specific setup and security requirements. Always test thoroughly after changing permissions to ensure your application functions correctly.
7. Nginx Configuration
Before we set up our Nginx configuration, let's remove the default configuration:
sudo rm /etc/nginx/sites-enabled/default
Now, let's create our configuration file:
sudo nano /etc/nginx/sites-available/myproject
Add the following content:
server {
    # replace your domain names with placeholder tymr.online
    server_name tymr.online www.tymr.online;  # Your domain name(s)

    location = /favicon.ico {
        access_log off;
        log_not_found off;
    }  # Efficiently handle favicon requests

    location /static/ {
        root /home/username/myproject;  # Path to your static files
    }  # Serve static files directly

    location / {
        proxy_pass http://unix:/home/username/myproject/myproject.sock;  # Pass requests to Uvicorn
        proxy_http_version 1.1;
        proxy_set_header Upgrade $http_upgrade;
        proxy_set_header Connection "upgrade";
        proxy_set_header Host $host;
        proxy_set_header X-Real-IP $remote_addr;
        proxy_set_header X-Forwarded-For $proxy_add_x_forwarded_for;
        proxy_set_header X-Forwarded-Proto $scheme;
    }  # Proxy settings for Uvicorn
}
Let's break this down:
server_name: Specifies which domain names this server block should respond to.location = /favicon.ico: Efficiently handles favicon requests.location /static/: Configures Nginx to serve static files directly, without passing the request to Django.location /: The main block that handles all other requests.proxy_pass: Forwards requests to our Uvicorn server.The
proxy_set_headerdirectives: Pass necessary headers to the Django application.
After creating this file, enable it:
sudo ln -s /etc/nginx/sites-available/myproject /etc/nginx/sites-enabled
This creates a symbolic link, effectively enabling our configuration.
Test the Nginx configuration:
sudo nginx -t
If it's okay, restart Nginx:
sudo systemctl restart nginx
8. Setting Up SSL with Let's Encrypt
We'll use Snap to install Certbot, which automates the process of obtaining and renewing Let's Encrypt certificates. Before you start, the domain's A record must point at the server; the guide to adding an A record for your domain shows what that record looks like.
Remove any old Certbot installations:
Shell sudo apt remove certbotInstall Certbot via Snap:
Shell sudo snap install --classic certbotThe
--classicflag allows Certbot to access system resources outside of the snap's confined environment.Create a symbolic link for easy access:
Shell sudo ln -s /snap/bin/certbot /usr/local/bin/certbotObtain and install the certificate:
Shell sudo certbot --nginx -d tymr.online -d www.tymr.onlineThis command will:
Obtain a certificate for your domains
Automatically configure Nginx to use the new certificate
Set up automatic renewal
Test that renewal works:
Shell sudo certbot renew --dry-run
Follow the prompts during the Certbot execution. It will ask for your email and agreement to terms of service.
The steps follow Certbot's official instructions for Nginx, which are the place to check if a command changes.
9. Configuring Supervisor
Supervisor is a process control system that allows you to monitor and control a number of processes on UNIX-like operating systems. We use Supervisor because:
It automatically restarts processes if they crash.
It starts processes on system boot.
It provides an easy way to start, stop, and monitor processes.
It logs stdout and stderr of the processes it manages.
Here's how to set it up:
Install Supervisor:
Shell sudo apt install supervisorCreate a configuration file:
Shell sudo nano /etc/supervisor/conf.d/myproject.confAdd the following content:
[program:myproject]
command=/home/username/myproject/venv/bin/uvicorn myproject.asgi:application --uds /home/username/myproject/myproject.sock
directory=/home/username/myproject
user=username
autostart=true
autorestart=true
stderr_logfile=/var/log/myproject.err.log
stdout_logfile=/var/log/myproject.out.log

[program:celery]
command=/home/username/myproject/venv/bin/celery -A myproject worker -l info
directory=/home/username/myproject
user=username
autostart=true
autorestart=true
stderr_logfile=/var/log/celery.err.log
stdout_logfile=/var/log/celery.out.log

[program:redis_scheduler]
command=/home/username/myproject/venv/bin/python manage.py redis_scheduler
directory=/home/username/myproject
user=username
autostart=true
autorestart=true
stderr_logfile=/var/log/redis_scheduler.err.log
stdout_logfile=/var/log/redis_scheduler.out.log
Uvicorn's option for a Unix socket is --uds (the first version of this guide said --unix-socket, which Uvicorn does not accept). Django's guide to running Uvicorn also shows how to run several worker processes.
This configuration sets up three processes:
Your Django application running with Uvicorn
A Celery worker for background tasks
Your custom Redis scheduler
Reload Supervisor to apply changes:
Shell sudo supervisorctl reread sudo supervisorctl update
Supervisor is different from simple systemd services because it provides more fine-grained control and is specifically designed for managing application processes, making it ideal for complex setups like Django projects with multiple components.
10. Firewall Configuration
UFW (Uncomplicated Firewall) is a user-friendly interface for managing iptables, the default firewall management tool for Ubuntu.
Allow SSH first, then the web ports, and only then enable the firewall, so you never cut off your own SSH session:
sudo ufw allow OpenSSH
sudo ufw allow 'Nginx Full'
sudo ufw enable
These commands allow SSH connections and both HTTP and HTTPS traffic for Nginx.
Check the status:
sudo ufw status
Final List of UFW Commands:
sudo ufw allow OpenSSH # You need to allow SSH so you can access your VPS remotely.
sudo ufw allow 'Nginx HTTP'
sudo ufw allow 'Nginx HTTPS'
sudo ufw allow 8000  # Optional, for development server
sudo ufw enable
sudo ufw status
Open port 8000 only while you test with the development server, and close it again with sudo ufw delete allow 8000: in production every request should go through Nginx.
11. Deploying Your Django Application
Collect static files:
python manage.py collectstatic
Apply migrations:
python manage.py migrate
12. Running the Redis Scheduler
The Redis scheduler should now be managed by Supervisor. You can check its status with:
sudo supervisorctl status
13. Custom Scripts for Process Management
To simplify starting and stopping all processes, you can create custom scripts. Here are examples:
Create a start script:
Shell nano ~/start_all.shAdd the following content:
Shell #!/bin/bash sudo supervisorctl start all sudo systemctl start nginxCreate a stop script:
Shell nano ~/stop_all.shAdd the following content:
Shell #!/bin/bash sudo supervisorctl stop all sudo systemctl stop nginxMake these scripts executable:
Shell chmod +x ~/start_all.sh ~/stop_all.sh
Now you can start all processes with ./start_all.sh and stop them with ./stop_all.sh.
Remember to run these scripts with sudo if your user doesn't have the necessary permissions.
14. Monitoring and Maintenance
Regularly update your system:
sudo apt update
sudo apt upgrade
Monitor your logs:
tail -f /var/log/myproject.err.log
tail -f /var/log/myproject.out.log
tail -f /var/log/redis_scheduler.err.log
tail -f /var/log/redis_scheduler.out.log
Bots will try your SSH port and your Django admin login within days. Protecting the Django admin login with Fail2Ban shows how to ban the repeat offenders.
15. Troubleshooting
If your site isn't accessible, check Nginx status:
sudo systemctl status nginxIf Uvicorn isn't running, check Supervisor:
sudo supervisorctl statusCheck Nginx error logs:
sudo tail -f /var/log/nginx/error.logEnsure your firewall isn't blocking connections:
sudo ufw status502 Bad Gateway: Nginx cannot reach Uvicorn's socket. Check that the program is running in
sudo supervisorctl statusand that the socket path in the Nginx config matches the one after--uds.403 Forbidden on static files, or a 502 with "Permission denied" in the Nginx log: since Ubuntu 21.04, home directories are created with mode 750, so the
www-datauser cannot enter/home/username. Give it access withsudo chmod 755 /home/username, or keep the project outside your home directory.Bad Request (400): the domain is missing from
ALLOWED_HOSTS.CSRF verification failed on forms over HTTPS: add
https://plus your domain toCSRF_TRUSTED_ORIGINS.
What this setup does not cover yet
Your site is live, but three jobs are still on you:
Backups. Nothing saves the database yet. Schedule a daily dump, copy it off the server, and try a restore once.
Updates without downtime. Restarting Uvicorn after a
git pulldrops the requests in flight, and a broken commit takes the site down.A safe place to test. A staging copy with its own database, so a migration never runs first on real data.
If your project has a Vue.js frontend, the Django and Vue.js deployment guide covers serving both from one VPS. And if you would rather skip the Nginx and Supervisor setup entirely, deploying Django without Docker using gunicorn, systemd and Caddy shows a shorter stack and how ox automates it.
16. Conclusion
You've now deployed your Django application with Uvicorn, set up Nginx as a reverse proxy, configured SSL, and set up a Redis scheduler. Your application should be accessible via HTTPS at your domain.
Remember to keep your system and applications updated, monitor your logs, and maintain good security practices.
Key takeaways
- Uvicorn runs Django's ASGI app; Nginx sits in front as the reverse proxy and serves static files.
- Supervisor keeps Uvicorn, Celery and the scheduler running and restarts them if they crash.
- Lock down SSH with keys, allow SSH in UFW before enabling it, and check the cloud-init SSH override.
- Certbot gives free HTTPS and renews it; test renewal with
certbot renew --dry-run. - Most first-deploy errors are a socket path, home directory permissions, or
ALLOWED_HOSTS.
Frequently asked questions
Should I use Uvicorn or Gunicorn to run Django?
Use Uvicorn when your project relies on ASGI features such as async views or websockets, as this guide does. For a classic synchronous Django app, Gunicorn is the most common choice. Both sit behind Nginx the same way, and Gunicorn can also run Uvicorn workers if you want both process management and ASGI.
Do I need Supervisor if Ubuntu already has systemd?
No, systemd can also start your app at boot and restart it after a crash. This guide uses Supervisor because it groups the Django app, the Celery worker and the scheduler in one file with simple start, stop and status commands. Either tool works; pick one and manage every process with it.
Does Certbot renew the Let's Encrypt certificate automatically?
Yes. The snap version of Certbot installs a timer that renews certificates before they expire, and the Nginx plugin reloads Nginx after each renewal. Run sudo certbot renew --dry-run once after setup to prove renewal works. If it fails, check that port 80 is open and the domain still points at the server.
Why does Nginx show 502 Bad Gateway for my Django app?
Nginx could not get an answer from Uvicorn. Usually Uvicorn is not running, the socket path in proxy_pass differs from the one Uvicorn listens on, or Nginx cannot enter your home directory. Check sudo supervisorctl status, then /var/log/nginx/error.log, which names the exact path and error.
Next step
Once HTTPS works, set up a daily database backup before anything else, then add Fail2Ban for the admin login. If you want those jobs handled for you on the same kind of server, read how ox deploys Django without Docker.
Updated : answer-first summary, current SSH, Python and Certbot commands, the Uvicorn --uds fix, a safer firewall order, common errors, and a FAQ.
First published on blog.sorv.dev.